Getting Started
When using AutoNLU in a script, or from Jupyter, it is recommended to
use the autonlu.Model class which supports all functionality
and settings that autonlu.SimpleModel offers, but with a much
easier and comfortable interface. If you are integrating AutoNLU in an
existing software system, you might want to have a look at
autonlu.DocumentModel which offers a document centric API.
We will only give an overview over the most important features and use cases of AutoNLU in this document. For more in-depth information and for executable examples please have a look at the API reference and the tutorials section respectively.
A Minimal Working Example
Before being able to use AutoNLU at all, you will need to prove that
you have a valid licence. The easiest way to do this is to use
autonlu.login(), but this can also be achieved by setting the
environment variable DO_PRODUCT_KEY. See Before First Use
for more information. A minimal working example might therefore look
like this:
import autonlu
autonlu.login()  # Will prompt for user and password
model = autonlu.Model("DeepOpinion/hotels_absa_en")
model.predict(["The room was nice, but the staff was unfriendly"])
# Returns [[['Room', 'POS'], ['Staff', 'NEG']]]
Environment Variables
AutoNLU uses different environment variables to influence its
behavior. When using Jupyter, the environment variables can be set in
the notebook with %env VARNAME=VALUE or with
os.environ["VARNAME"]="VALUE" in scripts and notebooks.
DO_PRODUCT_KEYwill be used as the bearer authentication token if no other key is provided on function calls. The token is needed to verify that the user has a valid license for AutoNLU and as login credentials to interact with Studio (downloading models, downloading annotation data, …)DO_LOGGINGcan be used to switch certain logging messages on or off. By default, all logging messages will be generated by the system (the default logging level isDEBUG). Other possible values areWARN, andINFO(all the normal Python logging levels can be used). For day to day operation it is recommended to set this toWARNDO_DEVICEcan be used to overrule the automatic device selection of AutoNLU. In general, AutoNLU will use the GPU if one could be found and the CPU otherwise. If a CUDA capable GPU is present, but you want to use the CPU regardless, set this environment variable tocpu. Setting it tocudaif no CUDA capable GPU is present will likely lead to errors and crashesCUDA_VISIBLE_DEVICESis not an AutoNLU specific environment variable, but changes which devices are visible to CUDA and therefore AutoNLU. If this variable is not set, all available GPUs will be visible to CUDA, and all will be used by AutoNLU in parallel. If only certain GPUs should be used, set this variable to either a single number, or a comma separated list of device numbers. To see what GPUs are available on your system and what IDs they have, callnvidia-smion the command line. E.g.export CUDA_VISIBLE_DEVICES=0will force AutoNLU to only use the first GPU.
Supported Tasks
AutoNLU currently supports three different text classification tasks:
Label task: You want to predict exactly one label for each piece of text. A typical use case would be sentiment analysis where you would like to assign one sentiment to each piece of text.
Class task: You want to predict an arbitrary number of classes (from a given list) for each piece of text. A typical use case would be topic detection, since a text can have none of the possible topics, but it can also have multiple topics.
ClassLabel task: You want to predict one label from a list of possible labels for each of a list of classes. A typical use case would be aspect based sentiment analysis, where we want to predict exactly one sentiment for a number of different aspects.
Loading Models
Models can be loaded by specifying what model to load when creating
the autonlu.Model class. You can specify either a base model
that is used as a starting point for training or a model that was
already trained on a specific task to predict new data. The following
options are supported:
A path to a folder that contains a valid huggingface or Studio model
A name of a Studio model that your user account has access to. You can get a list of models that are available to you with
autonlu.list_models()A name of a base-model that is available on the Huggingface model store (https://huggingface.co/models)
You should be aware, that the model is only loaded once you call predict/train/finetune on it.
Examples
Path to model:
model = autonlu.Model("/path/to/my/own/model")Name of Studio model:
model = autonlu.Model("DeepOpinion/hotels_absa_en")Name of huggingface model:
model = autonlu.Model("albert-base-v2")
Predicting Data
Once an already trained model has been loaded, or a model has been
trained, new texts can be predicted with it using the
autonlu.Model.predict() method. A model automatically knows what
task it was trained on and will give its results in the same format
that is used as the training target Y and depends on the task the
model was trained for.
X = ["The room was very clean.",
     "The food was good, but the guys at the reception were bad."]
model = autonlu.Model("DeepOpinion/hotels_absa_en")
res = model.predict(X)
# res == [[['Cleanliness', 'POS'], ['Room', 'POS']],
#         [['Food', 'POS'], ['Reception', 'NEG'], ['Staff', 'NEG']]]
To show a progress bar during prediction, the option verbose=True
can be passed to predict (and to basically all other methods of
autonlu.Model).
If you would like to explicitly know the type of a model, you can use
the autonlu.check_model.modeltype() function.
Training a Model
A model can be trained for a specific task by loading a base model and
calling autonlu.Model.train(). The train command takes at minimum two
parameters (X and Y), where X is a list of texts to train
on and Y is the training target.
The training target can have three different formats, depending on what task (label-, class-, or classlabel-task) you want to solve:
Label Task
You have a label task if you want to predict exactly one label for each piece of text. A typical use case would be sentiment analysis where you would like to assign one sentiment to each text.
You are training for a label task if the given Y consists of a
list of strings, giving one label name for each piece of text in
X.
model = Model("albert-base-v2")
X = ["This was bad.", "This was great!"]
Y = ["negative", "positive"]
model.train(X, Y)
Class Task
You have a class task if you want to predict an arbitrary number of classes (from a given list) for each piece of text. A typical use case would be topic detection. A text can have none of the possible topics, but it can also have multiple topics.
You are training for a class task if the given Y consists of a
list of lists of strings, giving a list of class names for each piece
of text in X
model = Model("albert-base-v2")
X = ["I want a refund!",
     "The bill I got is not correct and I also have technical issues",
     "All good"]
Y = [["billing"],
     ["billing", "tech support"],
     []]
model.train(X, Y)
Class Label Task
You have a class label task if you want to predict one label from a list of possible labels for each of a list of classes for each piece of text. A typical use case would be aspect based sentiment analysis, where we want to predict a sentiment for a number of different aspects.
You are training for a class label task if the given Y consists of
a list of lists of class label lists (pairs) for each given text in
X
model = Model("albert-base-v2")
X = ["The room was nice.",
"The food was great, but the staff was unfriendly.",
"The room was horrible, but the waiters were welcoming"]
Y = [[["room", "POS"], ["food", "NONE"], ["staff", "NONE"]],
[["room", "NONE"], ["food", "POS"], ["staff", "NEG"]],
[["room", "NEG"], ["food", "NONE"], ["staff", "POS"]]
]
model.train(X, Y)
Since it is very often the case that there will be a certain label
which should be selected if no class is being mentioned (e.g. the
NONE label in the previous example) you can specify a
standard_label when creating a autonlu.Model. This
standard label will be used for all classes that are not explicitly
mentioned in Y. In addition, during inference, predictions with
this label will be omitted from the result. With a standard label, the
previous example can be rewritten as follows:
model = Model("albert-base-v2", standard_label="NONE")
X = ["The room was nice.",
     "The food was great, but the staff was unfriendly.",
     "The room was horrible, but the waiters were welcoming"]
Y = [[["room", "POS"]],
     [["food", "POS"], ["staff", "NEG"]],
     [["room", "NEG"],["staff", "POS"]]
    ]
model.train(X, Y)
Training and Evaluation Set
By default, AutoNLU measures the current performance of the trained
model on an evaluation dataset in regular intervals and uses this
information to decide when to stop training and which model should be
used in the end. For this, the system needs an evaluation dataset,
containing data that is not being used for training. If only X and
Y are given, AutoNLU randomly splits off 10% of the training data
for evaluating the model.
If you would like more control, you can manually specify an evaluation
dataset using the valX and valY parameters of the train
method.
To split a dataset, the function autonlu.split_dataset() can be used. If the
input data is the same, it is guaranteed that the dataset will always
be split in the same way. Multiple calls to the function can be used
if an evaluation and testing set should be created.
X = # ...
Y = # ...
X, Y, valX, valY = autonlu.split_dataset(X, Y, split_at=0.1)
model = Model("albert-base-v2")
model.train(X, Y, valX, valY)
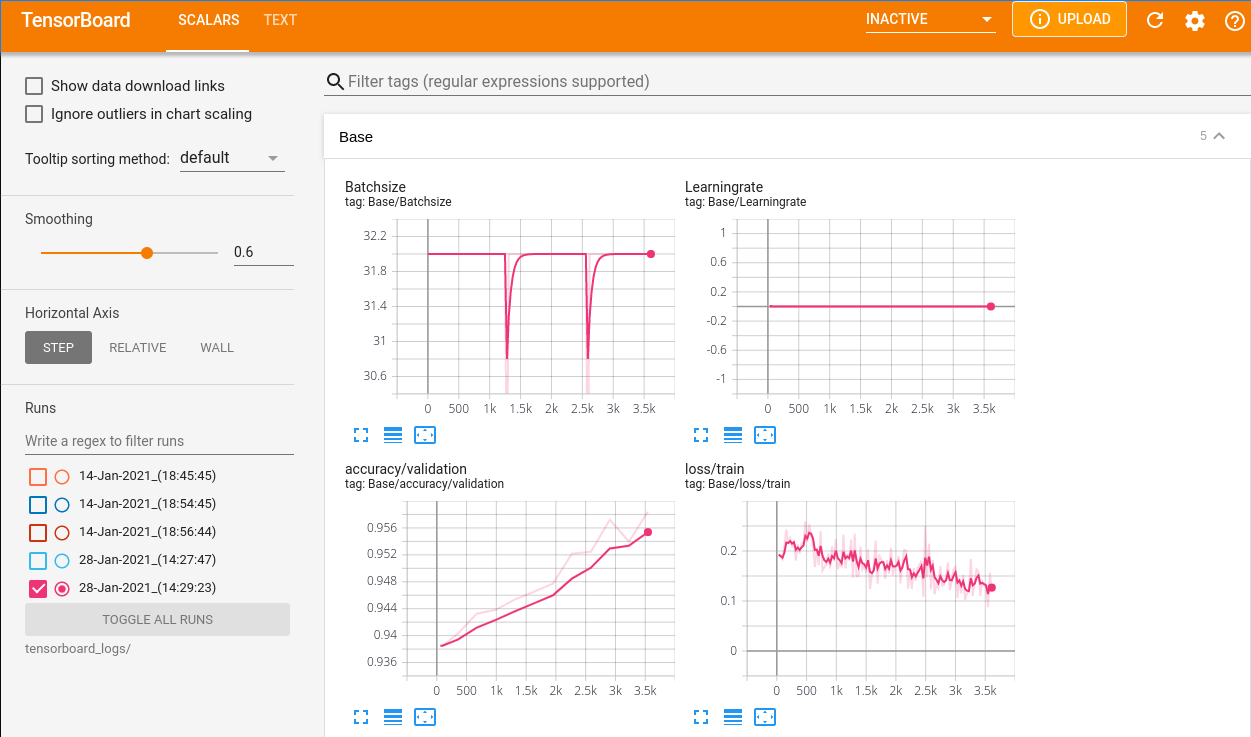
Visualization of the Training Process
During training, AutoNLU automatically produces tensorboard logs that
can be visualized. On the terminal go to the directory you started
your script/notebook from. You should see a directory called
tensorboard_logs, containing the tensorboard logs. Call
tensorboard --logdir=tensorboard_logs and you should be given a
url that you can open in your browser (usually
http://localhost:6006/). You will be able to see different metrics,
and how they change over time (e.g. training loss, validation loss and
accuracy, used GPU memory, …) while the model is training.
Language Model Fine Tuning
If there is enough text data available from the domain (or a closely related domain) of the task to be solved, an existing language model can be fine tuned further on this data. The data is required in the simple form of a text file where individual documents (e.g. reviews) are separated by two newlines.
A model can be fine tuned on this text file by using the
autonlu.Model.finetune() method. Fine tuning has multiple steps:
The given text file is tokenized and a
.tokensfile is produced in the same directory as the original text fileIn a burn in phase, the language model is kept fixed and the prediction heads for the different language model losses are trained on the new data to initialize them and get them used to the new domain. This phase is usually relatively short (a few minutes to half an hour)
The actual language model is trained. This phase can take quite a long time if a lot of training data is available (up to multiple days)
How long the burn in and language model training should be performed
can be controlled either via a number of epochs (one epoch means that
on average, each part of the text will have been seen by the model one
time). The number of epochs can be decimal values. A number of epochs
of 0.1 for example will mean that on average around 10% of the
training text will have been seen by the model.
Alternatively, one can specify a maximal time the model should be trained. This can be especially useful when using large text corpora and the time for even one epoch would exceed what is feasible.
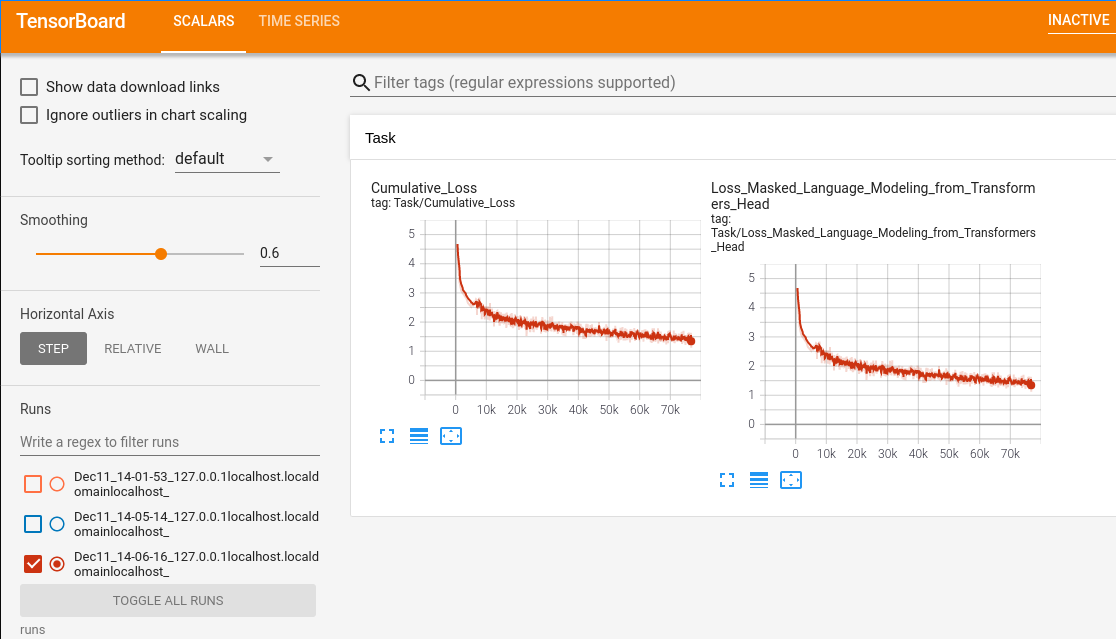
Visualization of the Finetuning Progress
Tensorboard logs are also written during finetuning with the
difference that the logs are saved in the directory runs. You will
be able to see how the language modeling loss changes over time. As
long as the loss in the graph (especially the Cumulative_Loss) is
getting smaller, the language model is probably still improving (as
long as the amount of text is sufficient so the model does not
overfit).
Active Learning
AutoNLU supports a process called active learning. Using active learning, you can ask an already trained model to select pieces of text that would provide the maximal amount of information to the system if labels for them would be available.
- The general workflow using active learning looks like this:
Train a model on existing training data
Use the trained model to select data that should be labeled from a corpus of currently unlabeled data
Label the selected data and add it to the training dataset
Repeat step 2 and 3 until the model becomes good enough
Active learning is supported using the
autonlu.Model.select_to_label() method. Have a look at the doc
string of this method for a more in depth explanation of all the
parameters.
Saving a Model
A model can be saved at any time using the save method. If a model
was only fine tuned, the saved model will be a base model that can be
used to train a variety of tasks. If a model is saved after training,
a task-specific model will be saved which can be trained further on
the same task or used to predict data.
Getting Annotations from Studio
Sometimes, one would like to train a model using AutoNLU, testing different setting and base-models, but use Studio for labeling of the data.
To get annotations from Studio, you will have to know the project id
that contains the annotations. The easiest way to find out the project
id is to click on your custom project in Studio and look at the url.
It should in part look like
http://studio.deepopinion.ai/projects/33/ and the number after
/projects/ is the project id.
You can get a list of all available annotations for this project by
calling autonlu.list_annotations() and giving the project id as
an argument.
To get annotated data from Studio, use the autonlu.get_annotations()
function and pass the project id. The data is already returned in a
format that can directly be used to train a autonlu.Model.
If you would like to exclude some annotations, you can pass a list of
the ids to exclude with the exclude parameter. The annotation ids
can be determined using autonlu.get_annotations()